If you’ve recently been given a glucometer or are thinking about starting to monitor your blood glucose levels, you might feel a bit uncertain about how to use it properly. Don’t worry! Using a glucometer is quick, easy, and can help you stay on top of your health. In this guide, we’ll walk you through each step of the process, explain how to get accurate results, and give you some tips to make your experience even easier.
Once you get the hang of it, using a glucometer will become a regular part of your routine, helping you make informed decisions about your diet, exercise, and overall well-being. So let’s dive in!
Step 1: Prepare Your Glucometer and Supplies
Before you start, gather everything you’ll need for the test:
- Glucometer (or Glucosometer)
- Test strips
- Lancet (or lancing device)
- Cotton ball or tissue (optional, in case you want to wipe the finger after pricking)
- A clean, flat surface to do the test
Insert the Test Strip:
First, place a test strip into your glucometer. Most glucometers will automatically power on when you insert the strip, and the screen will show you the prompts for the next steps.Check the Expiry Date of Test Strips:
Always check the expiration date of the test strips to ensure they’re still valid. Expired test strips can give inaccurate results.
Step 2: Prick Your Finger
Now comes the part where you get your blood sample. But don’t worry—it’s quick and easy!
Choose a Finger:
The best place to prick is on the side of your fingertip. It’s less painful than pricking directly on the center of your finger pad, and it makes it easier to get a drop of blood.Prepare the Lancet:
Use a lancing device (a pen-like tool that holds the lancet) to make a small, quick prick on the side of your fingertip. You can adjust the depth of the prick on some lancet devices for more comfort, especially if you have sensitive skin.Prick Your Finger:
Apply pressure on the device, and in a split second, the lancet will make a tiny puncture. You should feel a quick “poke” that’s over almost instantly. No need to worry—most people say it’s less painful than they expect.Wipe Away the First Drop of Blood:
After pricking, a small drop of blood will form. Wipe away the first drop with a tissue or cotton ball, as it can sometimes contain extra tissue fluid that may affect the reading.
Step 3: Apply the Blood Sample to the Test Strip
Gently Squeeze Your Finger:
Gently squeeze your finger to encourage a small drop of blood to form. Don’t squeeze too hard, or you may get extra blood that can make it harder to place the right amount on the test strip.Place the Blood on the Strip:
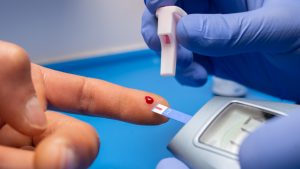
Touch the edge of the test strip to the blood drop. The strip will automatically draw the blood in, and you’ll see the glucometer start the testing process. Some meters may beep or flash when it’s ready.
Step 4: Wait for the Results
The glucometer will process the blood sample, and within seconds, the screen will show your blood glucose reading.
Read the Display:
The number displayed on the screen is your blood glucose level. Depending on the model of your glucometer, the number may appear in milligrams per deciliter (mg/dL) or millimoles per liter (mmol/L). If you’re unsure about what the number means, consult the instructions that came with your glucometer or ask your healthcare provider for guidance.Record the Result:
If your glucometer has memory storage, it will automatically save the result, but you may still want to keep a personal log of your readings to track trends. Some glucometers have apps or Bluetooth features that sync results directly to your phone.
Step 5: Dispose of the Used Materials Safely
After you’re done testing, make sure to dispose of the test strip and lancet properly:
- Dispose of the Test Strip: Test strips are single-use only. Throw them away in a small container or bag.
- Dispose of the Lancet: Lancets should be disposed of in a sharps container, which is specially designed to safely hold needles and other sharp objects. If you don’t have a sharps container, ask your healthcare provider where you can get one or use a sturdy, puncture-resistant container like a plastic bottle.
Tips for Accurate Testing:
Wash Your Hands First:
Always wash your hands before testing to avoid any contamination from food, lotions, or other substances that may affect the test result. Use warm water if your hands are cold—this will make it easier to get a good blood sample.Don’t Use Alcohol Pads:
Some people use alcohol pads to clean their fingers before testing. While this is fine, make sure your finger is completely dry before pricking it. Alcohol can interfere with the test result if it’s not dry.Check Your Glucometer Regularly:
Regularly check your glucometer to make sure it’s working properly. Some glucometers come with a control solution that you can use to test the accuracy of your meter. If you notice inconsistent readings or have doubts about the meter’s accuracy, replace the batteries or consult the manufacturer’s guide.Use Fresh Test Strips:
Always use new test strips when you test. Don’t try to reuse strips, as they can lose their accuracy after the first use.Use Different Fingers:
To avoid discomfort or soreness, alternate between fingers when you test. You don’t have to test on your dominant hand or always use the same finger.
When Should You Test?
Testing frequency depends on your health goals and recommendations from your healthcare provider. Generally, it’s good to test at different times of the day to see how your glucose levels fluctuate.
Some common times to test include:
- Before meals: To check your baseline blood glucose level.
- After meals: To see how your body responds to food.
- Before or after exercise: To monitor any changes in glucose levels due to physical activity.
Conclusion:
Using a glucometer is a simple, effective way to stay on top of your health and monitor your blood glucose levels. With a little practice, you’ll find that testing becomes quick and easy. Remember, the more consistent you are with monitoring, the better you’ll understand how your body responds to different foods, activities, and habits.
By following these simple steps and tips, you’ll feel confident using your glucometer and gaining valuable insights into your health. Take charge of your wellness and stay informed—your health is in your hands!

Type 2 Diabetes: Is It Really Reversible?
A recent National Geographic article [link] explores how type 2 diabetes could be reversible with the right approaches. This condition, which affects millions of people worldwide, has long been considered a chronic and progressive disease. However, recent research challenges this perception and suggests that with lifestyle changes and the right approach, remission is possible. The

How Do GLP-1 Drugs Compare? A Breakdown of Ozempic, Mounjaro, and Trulicity
GLP-1 receptor agonists have revolutionized diabetes management, with drugs like Ozempic, Mounjaro, and Trulicity leading the market. But how do these medications compare in terms of effectiveness, side effects, and patient outcomes? Let’s explore their differences and what they mean for diabetes patients. Understanding GLP-1 Medications GLP-1 receptor agonists mimic a natural hormone that helps

Why Has Medicare Spending on Diabetes Medications Skyrocketed in 5 Years?
In the past five years, Medicare spending on diabetes medications has increased nearly fivefold, reaching $35.8 billion in 2023. This surge has been primarily driven by the growing use of GLP-1 drugs such as Ozempic, Mounjaro, and Trulicity. But what is behind this cost escalation, and how does it affect patients and the U.S. healthcare

The Gut Microbiota and Blood Sugar Control: A Hidden Connection
The human gut is home to trillions of bacteria that play a crucial role in digestion, immune function, and even metabolism. Recent research has revealed a fascinating link between the gut microbiota and blood sugar regulation, shedding light on how the balance of microbes in our intestines can influence diabetes risk and overall metabolic health.

The Dawn Phenomenon: Why Blood Sugar Rises While You Sleep
For many people with diabetes, waking up with high blood sugar levels can be frustrating—especially if they didn’t eat anything overnight. This early-morning spike in blood glucose is known as the Dawn Phenomenon, and it happens due to natural hormonal changes in the body. But why does it occur, and how can it be managed?

The Influence of Red Light on Blood: Can It Improve Diabetes?
Type 2 diabetes is a metabolic disease characterized by insulin resistance and elevated blood glucose levels. In the search for complementary alternatives to improve glycemic control, red light therapy has gained attention due to its potential to enhance circulation, reduce inflammation, and optimize cellular function. But what does science say about it? ✨ What is

